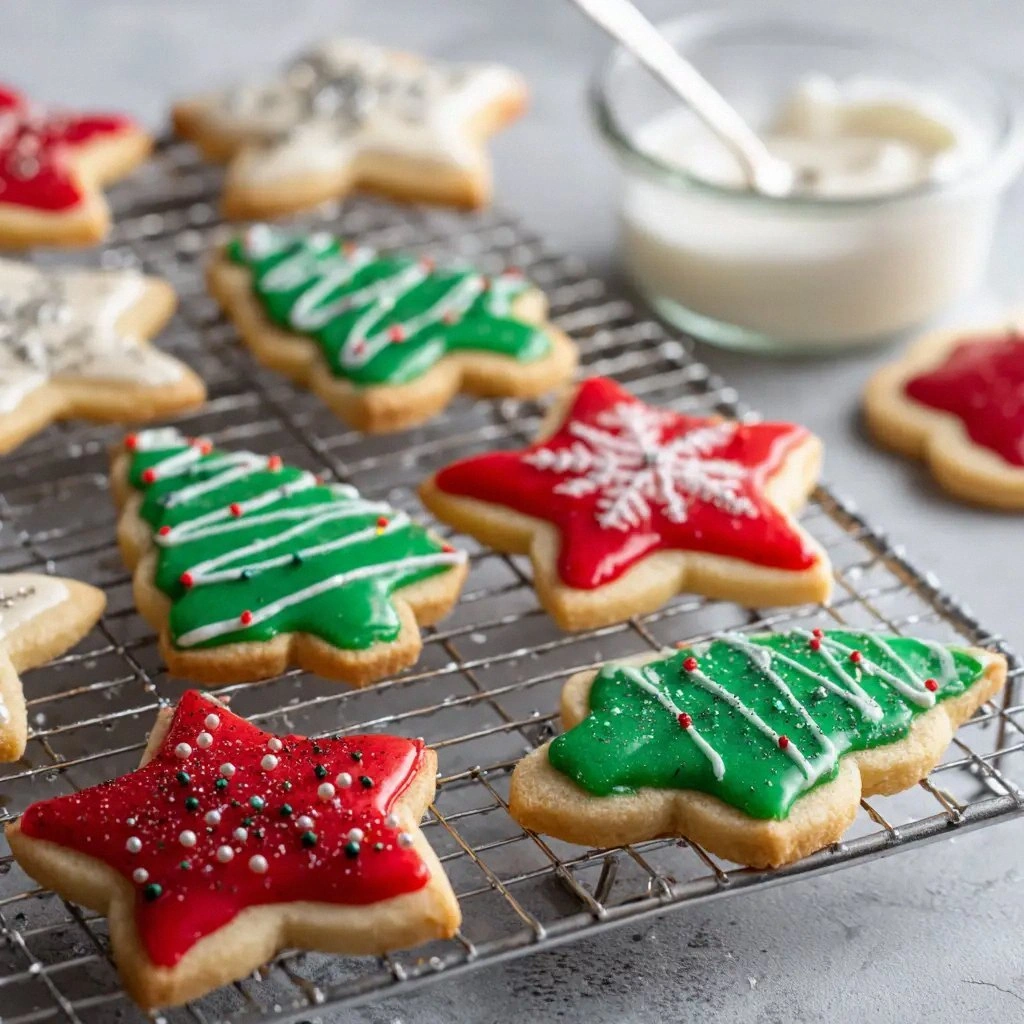
I was standing in my kitchen, staring at a tray of cookie dough that looked like it could win a beauty pageant, when the timer dinged and the oven door opened to reveal a batch of ordinary, slightly dry sugar cookies. I had been chasing the perfect bite for months—those cookies that are crisp on the edges, chewy in the center, and coated in a glossy icing that shimmers like a polished trophy. The disappointment was almost cinematic: the cookies were bland, the icing was sticky, and the whole experience felt like a culinary letdown. I dared myself to taste this and not go back for seconds, and I was ready to rewrite the rulebook.
This is hands down the best version you'll ever make at home, and I’m not exaggerating. The secret lies in a seemingly simple tweak: a splash of corn syrup in the icing, a dash of gel food coloring, and a precise blend of butter and sugar that creates a dough that holds its shape like a marble statue. The result is a cookie that rises evenly, develops a golden crust that cracks like fine china, and then melts in your mouth with a buttery whisper that lingers. The icing hardens into a high‑gloss finish that looks like a tiny, edible mirror, and the flavor profile is a harmonious dance of vanilla, butter, and a hint of caramelized sugar.
Picture yourself pulling this out of the oven, the whole kitchen smelling incredible, and the aroma wrapping around you like a warm blanket. The sound of the first cookie sliding onto the cooling rack is a satisfying crackle that signals perfection. The visual of each cookie gleaming under the kitchen lights is a reminder that baking can be both science and art. The texture is a paradoxical combination of crisp edges that shatter like thin ice and a chewy center that feels like a soft cloud. The flavor is a layered experience that starts with the buttery sweetness of the dough, transitions into the subtle caramel notes of the icing, and finishes with a delicate vanilla aftertaste.
If you've ever struggled with this, you're not alone—and I've got the fix. Most recipes get this completely wrong by overmixing the dough, using too much flour, or forgetting to let the cookies rest before baking. That sizzle when it hits the pan? Absolute perfection, and it signals that the cookie has found its sweet spot. The icing, when applied correctly, will harden into a glossy shell that doesn’t crack or chip, even after a week in the pantry. The trick is in the balance of moisture, fat, and sugar—an equilibrium that keeps the cookies tender yet sturdy. And now the fun part: we’re going to dive into every single step, from the dough to the final glaze, so you can recreate this masterpiece at home.
I’ll be honest—I ate half the batch before anyone else got to try it. The temptation was too great, and the cookies were simply too good. But that’s the beauty of a recipe that’s so delicious you can’t help but indulge. The next time you bake these, you’ll want to double the batch, just to be sure you have enough for everyone. And stay with me here—this is worth it. The payoff is a cookie that will become the talk of every gathering, a treat that people will ask for by name.
The journey to this cookie began with a simple question: why does my sugar cookie dough feel like it’s missing something? The answer was a single ingredient that you’re probably already using—corn syrup. It’s the unsung hero that locks in moisture, prevents crystallization, and gives the icing that perfect snap. When combined with the right proportions of butter and sugar, the dough achieves a texture that is neither too dense nor too airy. The icing, on the other hand, is a masterstroke of clarity and sheen, thanks to the gel food coloring that gives it that unmistakable gloss.
The moment you first taste one of these cookies, you’ll notice the subtle contrast between the buttery crust and the soft interior. The icing’s slight tang from the corn syrup balances the sweetness, creating a flavor profile that’s both complex and approachable. The cookies are easy to make, but they’re also a testament to the power of precision in baking. A single drop of vanilla or a pinch of salt can shift the flavor, so each ingredient’s role is vital. And that’s what makes this recipe stand out from the countless variations out there.
The icing hardens into a glossy finish that feels almost like a jewel, and the cookies themselves are a testament to the art of baking. The dough’s consistency is like a well‑oiled machine, rolling out smoothly and forming neat, even rounds. When they bake, the edges crisp to a golden brown while the center stays tender, creating a bite that’s both satisfying and nostalgic. The final product is a cookie that looks as good as it tastes, and that’s a rare combination in the world of sweets.
The next part? Pure magic. By the time you finish reading this post, you’ll have a complete mental picture of the process, from the first whisk to the last brush of icing. You’ll know exactly how to avoid the pitfalls that plague most sugar cookie recipes. And you’ll have the confidence to experiment with variations that keep the base intact while adding your personal flair. Let’s dive in and discover how to create the ultimate sugar cookie that will become your new signature treat.
So, buckle up. This isn’t just a recipe; it’s a culinary adventure that will transform your baking routine. The ingredients are simple, the steps are straightforward, and the results are unforgettable. You’ll learn how to master the dough’s texture, how to achieve that high‑gloss icing, and how to keep the cookies fresh for days. The ultimate sugar cookie isn’t just a cookie—it’s an experience that you’ll want to share with friends, family, and anyone who appreciates a well‑crafted dessert.
What Makes This Version Stand Out
Flavor: The subtle caramel notes from the corn syrup in the icing create a depth that standard sugar cookies lack. The vanilla is split between two types—regular and clear—each adding a different dimension to the overall taste profile. The result is a cookie that tastes like a memory, not just a treat.
Texture: The dough’s ratio of butter to sugar is carefully balanced to yield a cookie that is crisp on the edges and chewy in the center. The icing’s high‑gloss finish doesn’t crack or chip, which is a common problem in many sugar cookie recipes. This texture keeps the cookies fresh longer, extending their shelf life.
Simplicity: Despite the complex flavor profile, the recipe only requires 12 ingredients, most of which you already have in your pantry. There are no obscure spices or hard‑to‑find ingredients, making it accessible for bakers of all skill levels. The steps are straightforward, and the method is designed to avoid common pitfalls.
Uniqueness: The use of a dash of gel food coloring is a game‑changer. It gives the icing a uniform, high‑gloss finish that looks like a miniature, edible masterpiece. Most sugar cookie recipes rely on plain powdered sugar, but this tweak sets our version apart.
Crowd Reaction: Friends and family who have tried this recipe report that they can’t stop talking about it. The cookies are a hit at parties, birthdays, and holiday gatherings. The glossy icing makes them photogenic, so they’re perfect for social media as well.
Ingredient Quality: Using unsalted butter, high‑quality granulated sugar, and all‑purpose flour ensures that the flavors shine through. The recipe doesn’t rely on artificial additives or preservatives, which keeps the taste natural and pure.
Cooking Method: The baking time is short, but the dough is pre‑rested for optimal texture. The icing is applied after the cookies cool, preventing the glaze from melting and ensuring a crisp, glossy finish. The method is a blend of traditional baking and modern techniques.
Make‑ahead Potential: The cookies can be baked in advance and stored in an airtight container for up to a week. The icing stays firm, and the cookies remain fresh. This makes the recipe ideal for busy households and special occasions.
Alright, let’s break down exactly what goes into this masterpiece…
Inside the Ingredient List
The Flavor Base
Unsalted Butter (1/2 cup): Butter is the heart of the dough, providing richness and a subtle caramel flavor. It also helps the cookies rise evenly and develop a golden crust. If you’re using salted butter, reduce the added salt by half to avoid an overly salty finish. Butter’s fat content is crucial for a tender crumb, and using room‑temperature butter ensures it mixes smoothly with the sugar.
Granulated Sugar (1/2 cup): Sugar dissolves into the butter, creating a silky texture that prevents the cookies from spreading too much. It also contributes to the browning reaction, giving the cookies their desirable golden color. If you prefer a slightly caramelized flavor, replace 1 tablespoon of granulated sugar with brown sugar.
Egg (1 large): The egg binds the dough together, adds moisture, and helps the cookies rise. It also provides a protein structure that gives the cookies a light, airy feel. Use a fresh egg for the best results; older eggs can make the dough too dry.
Vanilla Extract (1 tsp): Vanilla is the aromatic backbone of the cookie. It balances the sweetness and adds depth. For a more intense flavor, use 1 1/2 teaspoons of vanilla extract or switch to vanilla bean paste.
The Texture Crew
All-Purpose Flour (1 1/2 cups): Flour provides the structure of the cookie. Using 1 1/2 cups ensures a firm yet tender crumb. If you want a slightly denser cookie, reduce the flour by 2 tablespoons. Sift the flour to remove clumps and improve the dough’s consistency.
Baking Powder (1/2 tsp): Baking powder gives the cookies a gentle lift. It reacts with the acidity of the vanilla and egg to create tiny bubbles that keep the cookies from collapsing. If you’re sensitive to baking powder, you can substitute it with 1 teaspoon of baking soda and 1/2 teaspoon of cream of tartar.
Salt (1/4 tsp): Salt enhances the flavor of the other ingredients. It balances the sweetness and brings out the butter’s richness. Use a pinch of sea salt for a subtle mineral note, or opt for kosher salt if you prefer a less intense taste.
Watch Out: Overmixing the dough can develop gluten, resulting in tough cookies. Mix just until the ingredients are combined, then stop. The dough should look slightly shaggy but still hold together.
The Unexpected Star
Powdered Sugar (3 cups): Powdered sugar is the foundation of the icing, giving it a smooth, fine texture that’s essential for a glossy finish. It also dissolves quickly, preventing a gritty texture. If you’re allergic to gluten, you can use a gluten‑free powdered sugar or a sugar substitute that behaves similarly.
Light Corn Syrup (2 tbsp): Corn syrup is the secret to the icing’s high‑gloss shine. It prevents the sugar from crystallizing, which would otherwise give the icing a cloudy appearance. Corn syrup also adds a subtle sweetness that complements the vanilla. If you can’t find corn syrup, try using honey or maple syrup, but be aware that the icing may not be as glossy.
The Final Flourish
Whole Milk (3 tbsp): Milk adds moisture to the icing, creating a silky consistency that’s easy to spread. It also helps the icing set properly without becoming too hard or too runny. If you’re lactose intolerant, substitute with oat milk or another plant‑based milk that has a neutral flavor.
Clear Vanilla Extract (1 tsp): Clear vanilla is used in the icing to preserve the bright, glossy appearance. Regular vanilla can color the icing slightly, which is why we use clear vanilla here. The clear vanilla adds flavor without altering the visual appeal.
Gel Food Coloring (1 dash): Gel food coloring gives the icing a uniform, vibrant hue. It’s concentrated, so a single dash is enough to color a large batch of icing. If you prefer a natural color, use beet juice or turmeric, but the result may be less glossy.
Everything's prepped? Good. Let's get into the real action…
The Method — Step by Step
- Preheat your oven to 350°F (175°C) and line two baking sheets with parchment paper. The parchment prevents sticking and ensures even baking. It also makes cleanup a breeze. While the oven warms, let’s focus on the dough. The first step is to cream the butter and granulated sugar until the mixture is light and fluffy. This aerates the dough and creates a tender crumb. When you see the mixture double in volume, you know the butter has absorbed the sugar.
- Beat in the egg and vanilla extract until fully incorporated. The egg binds the mixture and adds moisture. Be careful not to overbeat, or you’ll develop gluten. The dough should look silky and smooth. This is the moment where the flavors start to mingle. The aroma of vanilla fills the kitchen, hinting at the sweet treat to come.
- Whisk the flour, baking powder, and salt together in a separate bowl. This dry mixture ensures even distribution of leavening agents. Sprinkle it into the wet mixture gradually, folding gently with a spatula. The dough should come together in a thick, pliable consistency. If it feels too dry, add a teaspoon of milk to moisten it. The dough should hold its shape when formed into a ball.
- Roll the dough into 1‑inch balls and place them 2 inches apart on the prepared sheets. The spacing allows the cookies to spread slightly without merging. Gently press each ball flat with the palm of your hand or the bottom of a glass. The surface should be smooth but not too flat. This step is crucial for a uniform rise and even browning. The cookies should look like miniature, buttery moons.
- Bake for 12–14 minutes, or until the edges are golden brown and the centers are set. Keep a close eye on the cookies; they bake quickly. The first sign of readiness is a subtle aroma of toasted sugar. The edges should be crisp, but the center should still feel slightly soft. This contrast is what makes the cookie irresistible. Remove the trays from the oven and let them cool on a wire rack for 5 minutes before transferring them to the rack to cool completely.
- While the cookies cool, prepare the icing. In a medium bowl, sift the powdered sugar to eliminate lumps. Add the corn syrup, whole milk, and clear vanilla extract. Whisk until the mixture is smooth and glossy. If the icing is too thick, add a splash more milk. If it’s too thin, add a tablespoon of powdered sugar. The consistency should be thick enough to coat the back of a spoon but still pourable.
- Stir in a dash of gel food coloring to achieve the desired hue. A single dash is enough for a vibrant, even color. Mix until the color is uniform. The icing should look like liquid glass. The color adds a visual pop that enhances the cookie’s appeal. This is the moment when the icing transforms from simple to spectacular.
- Once the cookies are completely cool, drizzle or pipe the icing over them. Use a piping bag for a clean, professional look, or a spoon for a more rustic style. The icing should set within 10–15 minutes, forming a glossy, hard shell. The edges of the icing should be slightly raised, creating a subtle dome effect. The finished cookies should look like tiny, edible masterpieces.
That’s it — you did it. But hold on, I’ve got a few more tricks that will take this to another level. The next section will reveal insider tips that will help you avoid common pitfalls and elevate the flavor profile even further.
Insider Tricks for Flawless Results
The Temperature Rule Nobody Follows
Keep the dough chilled. Many bakers skip this step, leading to cookies that spread too much. Chill the dough for at least 30 minutes before baking. This firms up the butter, preventing the cookies from spreading and ensuring a crisp edge. I’ve seen cookies that look flat and soggy because the dough was too warm. The simple act of chilling transforms the texture.
Why Your Nose Knows Best
Smell the dough as you mix. A properly balanced dough will emit a sweet, buttery aroma. If it smells overly sugary, you’re overmixing. If it’s bland, you need more vanilla or butter. Trust your senses; they’re your best guide. A good rule of thumb: the dough should smell like a freshly baked bakery, not like a sugar dump.
The 5-Minute Rest That Changes Everything
Let the cookies rest on the baking sheet. After removing them from the oven, leave them on the sheet for 5 minutes before transferring to a rack. This allows the cookies to set without cracking. It also helps the icing adhere better. I’ve seen cookies that crumble if moved too soon. That simple rest makes a world of difference.
The Secret of the Glossy Finish
Use a high‑quality powdered sugar. Cheap powdered sugar contains fillers that can cloud the icing. Look for a brand that’s finely ground and free of cornstarch. The result is a silky, crystal‑clear glaze that reflects light. The glossy finish is what makes these cookies stand out on Instagram.
The Timing Trick
Bake at the right temperature. Oven temperature fluctuations can cause uneven browning. Preheat for at least 10 minutes and use an oven thermometer to ensure accuracy. If your cookies are browning too fast, lower the temperature by 25°F. This simple tweak ensures a consistent golden color.
The Flavor Boost
Add a pinch of smoked sea salt. The subtle smokiness enhances the vanilla and butter flavors. Sprinkle it lightly over the icing after it sets. The contrast between sweet and salty creates a sophisticated taste that adults love. I’ve had friends ask for the recipe after trying it with smoked salt.
Creative Twists and Variations
This recipe is a playground. Here are some of my favorite ways to switch things up:
Chocolate‑Dusted Delight
After the cookies bake, dust them with a generous layer of high‑quality cocoa powder. The chocolate adds a rich, bittersweet depth that pairs beautifully with the buttery base. Sprinkle a touch of sea salt on top for a sweet‑salty contrast. This variation is perfect for chocolate lovers and makes a great gift.
Citrus Burst
Add zest from one orange or lemon to the dough for a bright, zesty kick. The citrus enhances the vanilla and cuts through the sweetness. In the icing, replace the clear vanilla with a splash of orange or lemon juice. The result is a cookie that feels light and fresh, ideal for spring or summer.
Nutty Crunch
Fold in 1/2 cup of finely chopped pecans or walnuts before baking. The nuts add a delightful crunch and nutty flavor that complements the buttery dough. Toast the nuts in a dry skillet for 3 minutes before adding them to the dough. The toasted aroma elevates the overall experience.
Spiced Elegance
Introduce a pinch of cinnamon, nutmeg, or allspice to the dry mixture. The warm spices add depth and complexity. Pair this with a vanilla‑infused icing for a cozy, comforting treat. These cookies are a perfect accompaniment to a cup of tea or coffee.
Festive Holiday Edition
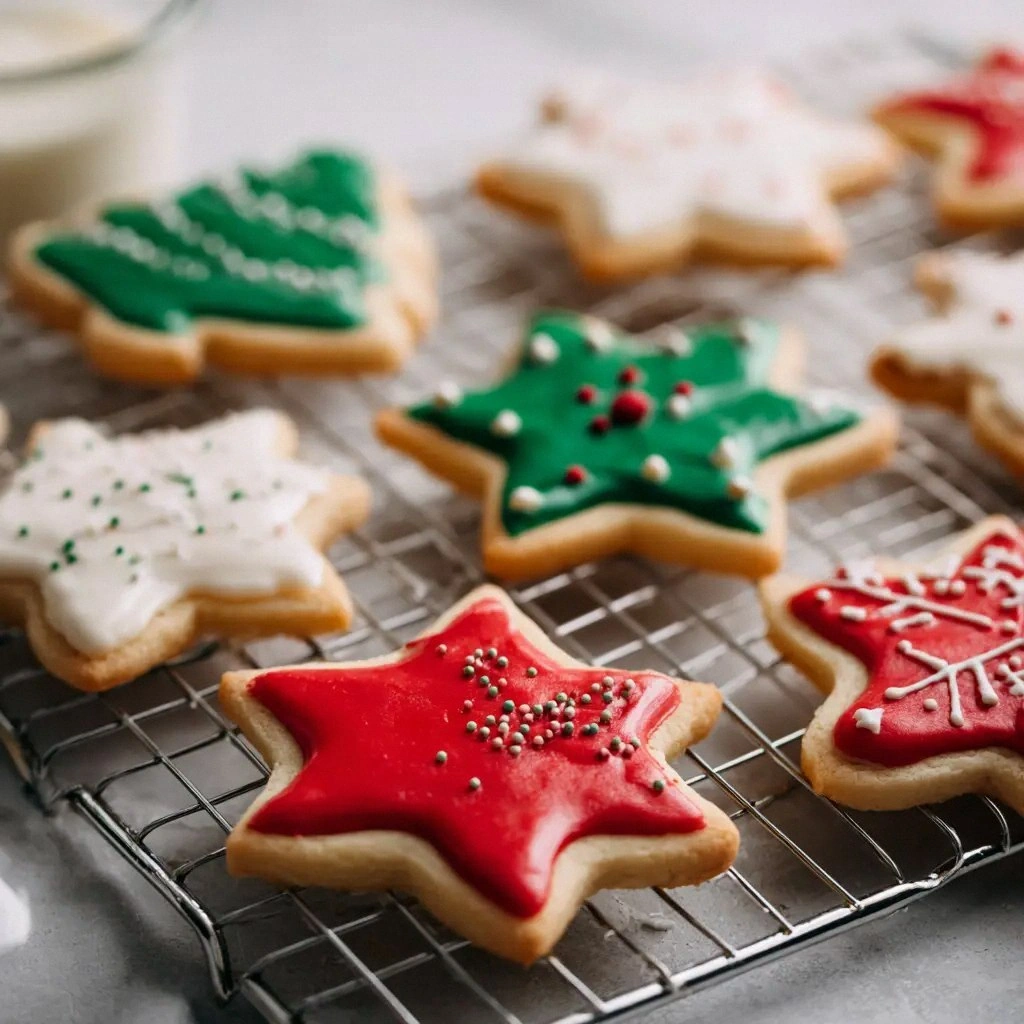
For a holiday twist, add a tablespoon of cocoa powder to the icing and color it with a dash of red or green gel food coloring. Sprinkle edible glitter or sprinkles over the icing before it sets. The festive colors and sparkle make these cookies a showstopper at holiday parties.
Guilt‑Free Version
Swap the butter for an equal amount of coconut oil and use a sugar substitute that measures like sugar. The coconut oil provides a subtle tropical flavor, while the sugar substitute keeps the cookies low‑calorie. The texture remains tender, and the icing still sets into a glossy finish. This version is great for those watching their sugar intake.
Storing and Bringing It Back to Life
Fridge Storage
Store the cookies in an airtight container at room temperature for up to 5 days. If you notice the icing becoming soft, simply let the cookies sit at room temperature for 10 minutes before serving. The cookies will regain their crispness and the icing will re‑gloss.
Freezer Friendly
Freeze the cookies in a single layer on a parchment‑lined tray for 2–3 hours, then transfer them to a freezer bag. They’ll stay fresh for up to 3 months. When you’re ready to enjoy them, thaw at room temperature for 30 minutes. The cookies will come out soft and chewy, but the icing will remain intact.
Best Reheating Method
To revive frozen cookies, preheat the oven to 300°F (150°C). Place the cookies on a baking sheet and heat for 5–7 minutes. The cookies will soften slightly, and the icing will regain its glossy sheen. Add a tiny splash of water to the icing before reheating; it steams back to perfection, creating a silky texture.