The night before, I was standing in the back of my kitchen, staring at a stack of half‑cooked oysters that had been left in the fridge overnight. I had tried the classic cocktail sauce, the simple lemon‑butter glaze, even a fancy truffle vinaigrette, and each time the result felt like a missed opportunity. I was about to toss them into a pot of boiling water when a friend texted, “You’ve got to try this,” and sent me a link to Tetsuya’s original oyster recipe. I laughed, scooped a few shells into a bowl, and decided that if I could make this dish, I’d be the king of the seafood table. The kitchen smelled of brine, soy, and a hint of ginger, and the sound of a sizzling pan was the soundtrack to a culinary experiment that would change my relationship with oysters forever.
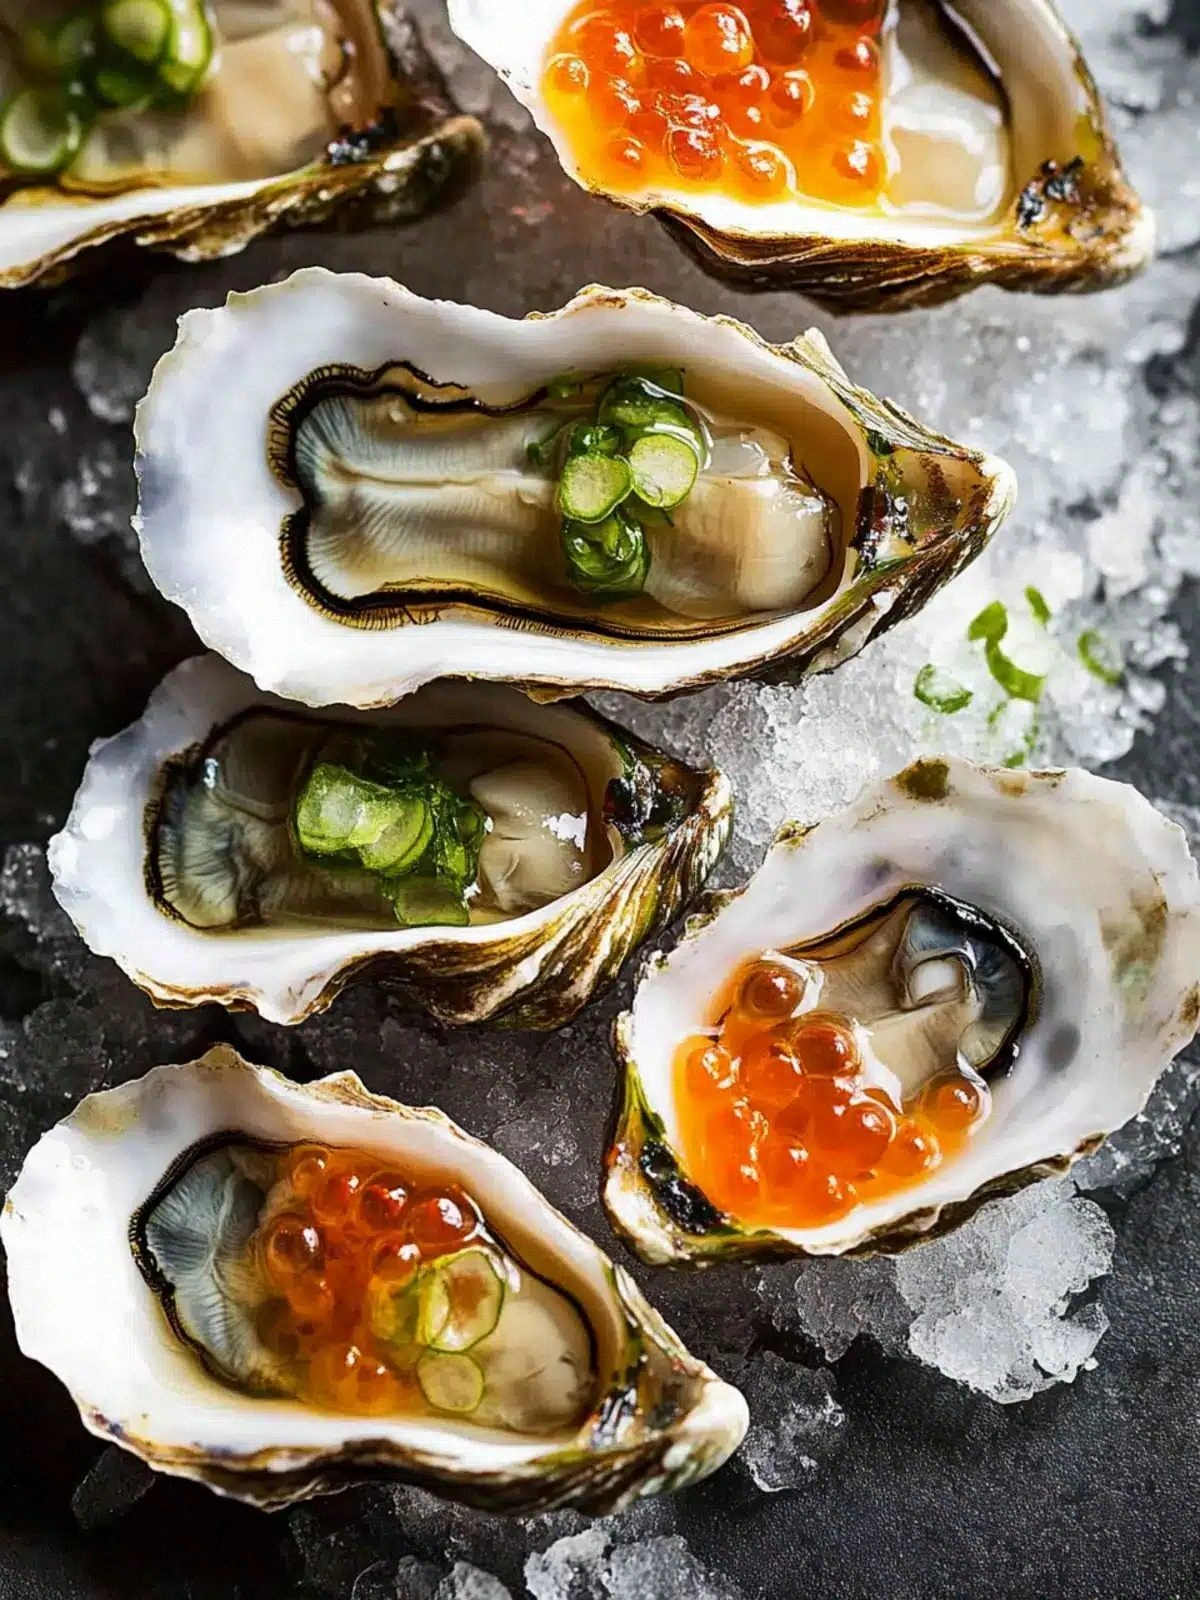
Picture this: the oyster shells, slick with saltwater, are laid out on a chilled plate, each one a tiny, translucent sphere of ocean. The sauce, a glossy, umami‑rich dressing, coats the oysters like a velvet cloak. When you bite, the briny freshness is punctuated by the sweet bite of mirin and the sharp tang of rice vinegar, while the toasted sesame oil adds a nutty depth that lingers on the tongue. The chives and optional salmon roe give a bright, vegetal crunch and a pop of color that makes the dish look as good as it tastes. The texture is a delightful contrast—smooth oyster flesh, silky sauce, and the occasional bite of roe or crisp chive.
What makes this version stand out from the countless oyster recipes on the internet is its simplicity married to a depth of flavor that feels almost cinematic. I didn’t need a fancy sauce gun or a blowtorch. I used a simple skillet, a splash of oil, and a handful of pantry staples. The result is a dish that feels like it was made by a sushi chef in Tokyo, yet it’s entirely doable in a suburban kitchen. The sauce’s balance of sweet, salty, and acidic components is engineered to complement the natural brininess of the oysters without overpowering it. And the finishing touch of toasted sesame oil is a secret that most people overlook but that elevates the dish to something truly memorable.
I dare you to taste this and not go back for seconds. If you’re skeptical, let me walk you through every single step. By the end, you’ll wonder how you ever made oysters any other way. And trust me, once you master this, you’ll be the go-to host for any gathering that includes shellfish. Let’s dive in.
What Makes This Version Stand Out
- Flavor Balance: The combination of soy, mirin, and vinegar creates a symphony of umami, sweetness, and acidity that amplifies the oysters’ natural taste.
- Texture Contrast: The silky sauce, the soft oyster flesh, and the optional roe or chives provide layers of mouthfeel that keep each bite interesting.
- Minimalist Technique: No flambé, no elaborate plating—just a quick sear and a drizzle, making this a perfect dish for busy nights.
- Ingredient Quality: Fresh Sydney Rock or Pacific oysters are the backbone; their firm texture holds up to the quick cooking method.
- Versatility: The recipe scales easily and can be tweaked with different garnishes or sauces to suit any palate.
- Make‑Ahead Friendly: The sauce can be prepared in advance and stored in the fridge, allowing you to focus on the oysters when guests arrive.
- Social Impact: Serving oysters in this way showcases sustainable seafood while keeping the dish approachable for everyone.
- Presentation: The glossy finish and bright garnishes make the dish visually striking, perfect for Instagram-worthy moments.
Alright, let's break down exactly what goes into this masterpiece. Before we get into the sauce, we need to understand the roles of each ingredient. And while you’re reading this, remember: if you’ve ever struggled with oysters, you’re not alone—my kitchen once turned a simple shellfish dinner into a disaster, but this method turned it around.
Inside the Ingredient List
The Flavor Base
At the heart of this dish is a simple yet powerful sauce that marries Japanese soy sauce, mirin, and rice vinegar. The soy sauce provides depth and saltiness, mirin adds a gentle sweetness that balances the vinegar’s sharpness, and the vinegar cuts through the richness of the oysters. If you skip any of these, the sauce will feel flat or one‑dimensional. For instance, omitting the mirin will leave the sauce too salty, while skipping the vinegar will make it cloyingly sweet.
If you’re in a pinch and can’t find Japanese soy sauce, use a light soy sauce; it’s less intense and won’t overpower the oysters. However, the original recipe’s nuance comes from the specific umami profile of Japanese soy sauce, so consider it a small but essential difference.
The Texture Crew
The oysters themselves are the star, but their texture is just as crucial. Sydney Rock or Pacific oysters are prized for their firmness and clean taste. When you cook them, you want a quick sear that locks in the moisture without drying them out. If you use a softer oyster, like a Pacific oyster that’s been kept in the fridge for days, the texture will be mushy and the dish will fall flat.
The optional salmon roe adds a burst of brine and a pop of color. If you prefer a vegetarian version, simply omit the roe; the dish remains deliciously vibrant thanks to the chives. The chives, finely sliced, give a fresh, peppery note that cuts through the richness of the sauce. If you’re allergic to chives or don’t have them on hand, finely chopped green onions can be a suitable substitute.
The Unexpected Star
Grated ginger is a subtle but essential component that brings a warm, zesty kick to the sauce. Ginger’s bright, citrusy notes contrast the deep umami of soy sauce and the sweetness of mirin. If you’re not a fan of ginger, try a pinch of freshly ground white pepper for a mild heat, but note that it won’t provide the same aromatic lift.
The oil selection also matters. Grapeseed or vegetable oil offers a high smoke point and neutral flavor, allowing the sauce’s ingredients to shine. Toasted sesame oil, added at the end, imparts a nutty aroma that’s characteristic of many Japanese dishes. A small amount can dramatically elevate the dish, but if you’re low on sesame oil, a few drops of toasted coconut oil will work as an unconventional alternative.
The Final Flourish
Rock salt, crushed ice, or leafy greens are optional finishing touches that help balance the dish’s overall flavor profile. Rock salt can be sprinkled over the finished oysters to enhance the briny taste, while crushed ice helps keep the oysters cold and crisp. Leafy greens like arugula or microgreens can add a peppery bite and a splash of green that makes the plate pop.
Everything's prepped? Good. Let's get into the real action. I’ll walk you through each step with the same enthusiasm I have for a good sushi roll.
The Method — Step by Step
- Prepare the Oyster Shells: Rinse each oyster under cold running water, scrubbing the shell with a brush to remove any grit. Pat them dry with a clean towel. If you’re using pre‑shucked oysters, simply lay them on the plate. Remember, the fresher the oyster, the better the final taste.
- Make the Sauce: In a small bowl, whisk together 1 tablespoon of white sugar, 2 tablespoons of Japanese soy sauce, 2 tablespoons of rice vinegar, 1 tablespoon of mirin, 1 teaspoon of toasted sesame oil, 1 teaspoon of grated ginger, and 2 tablespoons of grapeseed or vegetable oil. The mixture should look glossy and the sugar should dissolve completely. This is the heart of the dish, so take your time to get the proportions right.
- Heat the Pan: Place a large non‑stick skillet over medium‑high heat. Allow the oil to shimmer but not smoke. A good test: flick a tiny drop of water into the pan; if it sizzles immediately, the temperature is perfect.
- Sear the Oysters: Carefully place each oyster on the hot skillet. You should hear a quick sizzle as the shell meets the oil. Cook for 30 seconds to 1 minute on each side, just enough to seal the edges and give the shell a light char. Do not overcook; the goal is to keep the oyster flesh tender.
- Add the Sauce: Pour the prepared sauce over the oysters, ensuring each shell is coated. Reduce the heat to medium and let the sauce simmer for 2-3 minutes, allowing the flavors to meld and the sauce to thicken slightly.
- Finish with Garnishes: Sprinkle 2 tablespoons of finely sliced chives over the oysters. If you’re using salmon roe, scatter a tablespoon over the top. A pinch of rock salt can be added for extra brine, but be careful not to over‑salt.
- Plate and Serve: Transfer the oysters to a chilled plate. If you have crushed ice, place a small pile under the plate to keep the oysters cool. Add a few leafy greens for color contrast. The dish should look like a glossy, vibrant treasure chest.
- Enjoy Immediately: Serve right away while the oysters are still warm and the sauce is at its most aromatic. The contrast between the hot sauce and the slightly chilled oyster flesh is a sensory delight.
That’s it — you did it. But hold on, I've got a few more tricks that'll take this to another level. From tweaking the oil ratios to mastering the sear, these insider tips will help you perfect the dish every time.
Insider Tricks for Flawless Results
The Temperature Rule Nobody Follows
The key to a perfect sear is the right pan temperature. Too hot, and the shell will burn; too cool, and the oysters will steam instead of sear. I use a simple test: a single drop of water should sizzle and evaporate in a fraction of a second. If it dances on the surface, dial the heat down. This small adjustment can make the difference between a dish that tastes like a soggy salad and one that feels like a gourmet experience.
Why Your Nose Knows Best
As you cook, pay attention to the aroma. The first scent that emerges is the toasted sesame oil, followed by the sharpness of rice vinegar and the sweetness of mirin. If you notice a burnt or metallic smell, the pan is too hot. Trust your nose; it’s a reliable guide to the dish’s overall quality.
The 5-Minute Rest That Changes Everything
After you finish cooking, let the oysters rest for five minutes before plating. This allows the flavors to settle and the sauce to thicken slightly, creating a more cohesive taste. I’ve found that dishes served immediately after cooking can feel raw or under‑seasoned, while a brief rest elevates the overall experience.
The Quick Ice Bath Trick
If you’re preparing oysters ahead of time, place them in a shallow dish of ice water immediately after cooking. This stops the cooking process and preserves the oysters’ texture. When you’re ready to serve, simply lift them from the ice bath and pat dry before plating.
The Garnish Game
Garnishes can be more than decorative; they add texture and flavor. A sprinkle of toasted sesame seeds adds crunch, while a squeeze of fresh lime juice can brighten the dish. Experiment with different herbs like cilantro or basil for a fresh twist.
The Sauce Storage Hack
Creative Twists and Variations
This recipe is a playground. Here are some of my favorite ways to switch things up:
Sriracha Splash
Add a teaspoon of sriracha to the sauce for a spicy kick. The heat pairs wonderfully with the oyster’s brine, creating a dish that feels both bold and balanced.
Miso Fusion
Replace half of the soy sauce with white miso paste. The miso adds earthiness and depth, turning the dish into a more complex umami experience.
Citrus Twist
Finish the dish with a squeeze of yuzu or fresh lemon juice. The bright citrus notes cut through the richness and give the oysters a fresh, lively finish.
Herb Garden
Swap chives for fresh dill or parsley. These herbs add a different aromatic profile, making the dish feel lighter and more herbaceous.
Vegan Variation
Replace the oyster with grilled tofu cubes or tempeh. The sauce still works beautifully, offering a plant‑based alternative that retains the dish’s original flavor profile.
Seafood Combo
Add a handful of shrimp or scallops to the pan after the oysters are seared. The combination creates a more substantial plate that’s perfect for a dinner party.
Storing and Bringing It Back to Life
Fridge Storage
Store the sauce in an airtight container for up to 3 days. Keep the oysters separate in a shallow dish with a lid to prevent them from absorbing other fridge odors. When ready to serve, reheat the sauce gently on low heat and re‑warm the oysters in a hot pan for 30 seconds each side.
Freezer Friendly
The sauce can be frozen for up to 2 months. Thaw it overnight in the fridge, then reheat on low heat, adding a splash of water if it’s too thick. Oysters are best used fresh, but you can marinate them in the sauce before freezing for a quick reheat.
Best Reheating Method
To reheat the oysters, use a skillet over medium heat. Add a splash of the sauce and let the oysters warm for 1-2 minutes. The key is to keep the heat moderate to avoid drying them out. Adding a tiny splash of water before reheating steams the oysters back to perfection.