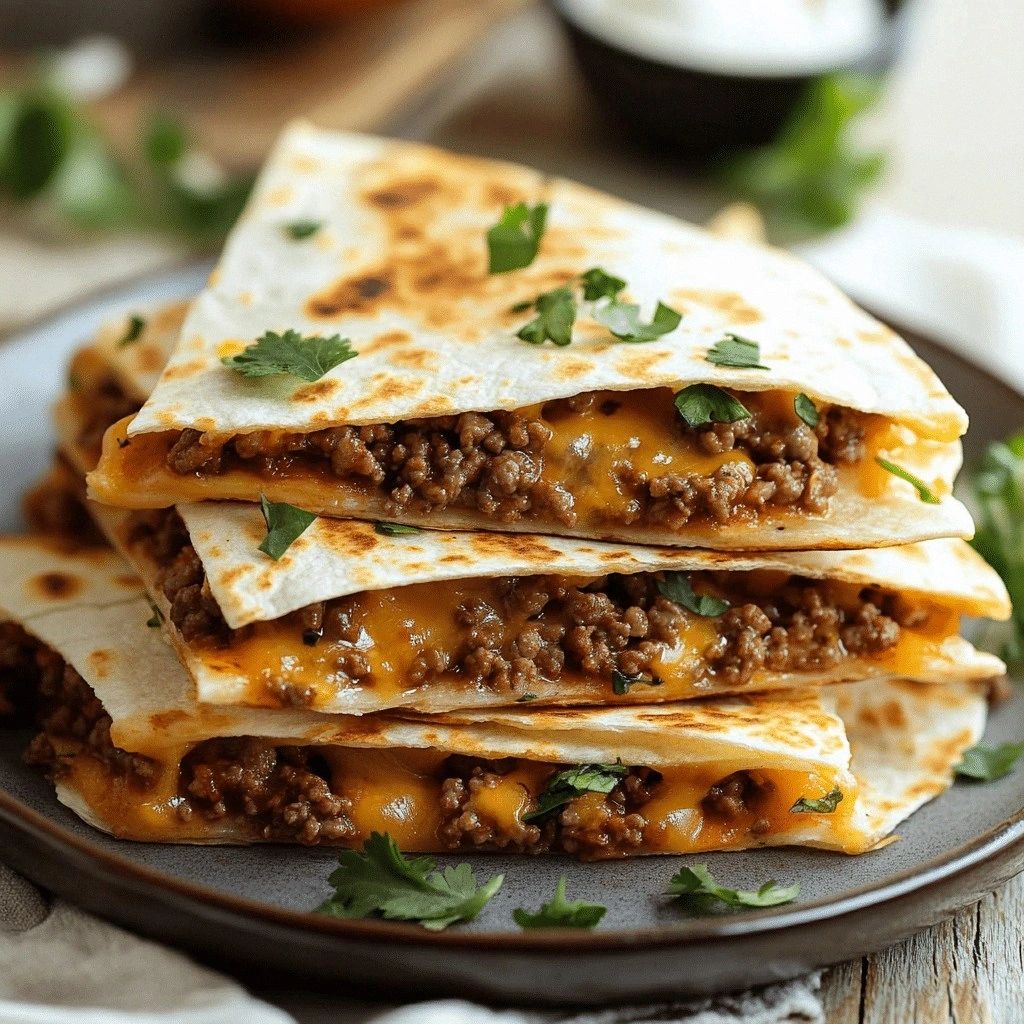
I was halfway through a week of bland take‑out when my kitchen lights flickered and a stray fire alarm roared. The only thing that could have saved the evening was a sizzling pan, a can of ground beef, and a stack of flour tortillas that had been gathering dust in the pantry. I dared myself to turn that emergency into an edible triumph, and the result was a plate of quesadillas that could make a seasoned chef blush. The moment the beef hit the pan, the air filled with a rich, meaty aroma that made my mouth water even before the first bite.
Picture this: the ground beef browning to a caramelized hue, the onions releasing their sweet perfume, and a splash of olive oil turning into a glossy, almost glossy sheen. The sizzle is the soundtrack of triumph, each pop a tiny drumbeat of flavor building. I can almost taste the sharp tang of cumin dancing with the smoky whisper of paprika, a duet that promises depth without overwhelming. The texture is a perfect balance—crisp edges that crackle like thin ice, a soft interior that melts like velvet on your tongue.
What makes this version stand out isn’t just the ingredients; it’s the method, the timing, the little things that most people overlook. I’ll be honest—half the batch was devoured before the first guest even had a chance to ask for seconds. That’s because this recipe is hands down the best version you’ll ever make at home. The secret is in the layering: a generous spread of seasoned beef, a generous heap of cheese, and a quick flip that seals the flavor. I dare you to taste this and not go back for seconds.
If you’ve ever struggled with making quesadillas that aren’t soggy or under‑cooked, you’re not alone. Most recipes get this completely wrong by over‑filling or using the wrong type of tortilla. I’ve perfected a technique that ensures every bite is crispy, cheesy, and perfectly seasoned. Picture yourself pulling this out of the skillet, the whole kitchen smelling incredible, and watching the golden edges shimmer like a sunrise. And now, ready for the game‑changer? Let’s walk through every single step—by the end, you’ll wonder how you ever made it any other way.
What Makes This Version Stand Out
- Flavor: The blend of cumin, chili powder, and smoked paprika creates a layered, smoky depth that turns ordinary beef into a flavor explosion.
- Texture: The combination of crisp tortilla edges and gooey cheese creates a satisfying contrast that keeps you reaching for more.
- Convenience: Every ingredient is pantry‑friendly, and the entire process takes less than 30 minutes from start to finish.
- Crowd‑Pleaser: These quesadillas are perfect for parties, potlucks, or a quick weeknight dinner—guests leave with a smile and a full stomach.
- Ingredient Quality: Using fresh ground beef and real cheddar gives a depth that pre‑mixed taco seasoning can’t match.
- Make‑Ahead Potential: The filling can be pre‑cooked and stored, making it a great option for busy mornings or meal‑prep sessions.
- Versatility: Swap out tortillas for corn or gluten‑free options, and you’ll still get the same mouth‑watering results.
- Nutrition: With balanced macros, these quesadillas can fit into a variety of dietary plans without feeling like a cheat meal.
Inside the Ingredient List
The Flavor Base
Ground Beef (1 lb): The heart of the dish, it should be a lean cut to avoid excess grease but still retain a juicy bite. If you prefer a leaner option, try 80/20 or even 90/10 ground turkey; the flavor profile stays similar. Skipping the beef would turn this into a vegetable skillet—fun, but it loses that meaty richness.
Olive Oil (1 tbsp): A splash of high‑quality olive oil elevates the sauté, giving the beef a silky texture. If you’re watching calories, a non‑stick spray works, but the oil’s flavor is a subtle backdrop that deserves its moment.
Onion, diced (1 medium): The sweet, caramelized onion brings a gentle sweetness that balances the spices. Cutting the onion into fine dice ensures it cooks quickly and integrates with the beef without becoming mushy.
Bell Pepper, diced (1 medium): Adds color, crunch, and a hint of natural sweetness. Choosing a red pepper gives a sweeter bite, while green offers a slightly bitter edge that contrasts nicely with the meat.
Garlic cloves, minced (2): Garlic’s sharpness cuts through the richness of the beef, creating a more complex palate. Mince finely to release maximum aroma; if you’re a garlic lover, add a third clove for extra punch.
The Spice Crew
Ground Cumin (1 tsp): Cumin’s earthy undertone is a staple in Mexican cuisine, providing depth without overpowering. Use fresh ground cumin for the best flavor; pre‑ground can lose potency over time.
Chili Powder (1 tsp): Adds a mild heat and a smoky nuance. Opt for a blend that includes ancho and guajillo for a richer taste; if you’re heat‑averse, reduce to half a teaspoon.
Smoked Paprika (1/2 tsp): The smoky flavor mimics the char that would come from a grill, adding an extra layer of complexity. If you can’t find smoked paprika, regular paprika will work, but the smoky undertone will be missing.
Salt & Pepper (to taste): The final seasoning step. Salt brings out the beef’s natural juices, while pepper adds a subtle bite. Remember, salt is addictive—add a pinch at a time and taste as you go.
The Texture Crew
Cheddar Cheese, shredded (1 cup): Offers sharpness and a melt that’s both creamy and slightly crumbly. Using a sharp cheddar gives a bite that stands out against the smooth cheese.
Monterey Jack Cheese, shredded (1 cup): Balances cheddar’s sharpness with a milder, creamier melt. The combination creates a cheese blend that’s both robust and smooth, ensuring each bite is indulgent.
Flour Tortillas (8): The foundation of the quesadilla. Choose a fresh, pliable tortilla to avoid tearing. If you’re gluten‑free, corn tortillas work well, but the texture will differ slightly.
The Final Flourish
Fresh Cilantro, chopped (1/4 cup): Adds a bright, herbal note that cuts through the richness. Cilantro’s citrusy undertone lifts the dish, making it feel fresher.
Salsa (1/2 cup): A tangy, spicy accompaniment that brings the dish together. Choose a chunky salsa for texture or a smooth one for a milder taste.
Sour Cream (1/2 cup, optional): Provides a cool, creamy contrast to the heat of the spices. If you’re watching calories, skip it or use a low‑fat version.
Everything's prepped? Good. Let's get into the real action and watch this humble combination transform into a culinary masterpiece.
The Method — Step by Step
- Heat the skillet: Place a large cast‑iron or stainless‑steel skillet over medium heat and add the tablespoon of olive oil. Once the oil shimmers, add the ground beef, breaking it apart with a spatula. The beef should sizzle loudly, a cue that the pan is hot enough. Let it cook untouched for a few minutes to develop a nice brown crust before stirring.
- Sauté aromatics: Push the beef to the side and pour a splash of water to deglaze the pan, scraping up any browned bits. Add the diced onion and bell pepper, cooking until they soften and release their sweet fragrance. Then stir in the minced garlic and cook for about 30 seconds until the aroma intensifies. This step builds the flavor foundation; don't rush it.
- Add spices: Sprinkle cumin, chili powder, smoked paprika, salt, and pepper over the mixture. Stir vigorously to coat the beef and vegetables, allowing the spices to toast for 1–2 minutes. The mixture should smell toasty, indicating the spices have released their oils.
- Set aside: Once the beef is fully cooked and seasoned, transfer the mixture to a bowl and cover loosely with foil. The filling will keep warm, and the flavors will meld while you prepare the tortillas.
- Warm tortillas: In a dry skillet over low heat, warm each tortilla for about 30 seconds on each side. The goal is pliability without burning. A warm tortilla holds the filling better and creates a crispier edge when cooked.
- Assemble: Spread a generous layer of the seasoned beef onto half of each tortilla. Sprinkle half of the cheddar and Monterey Jack over the meat, then fold the tortilla in half like a pocket. The cheese melts into the filling, creating a gooey bridge.
- Cook the quesadillas: Place the folded quesadilla in the hot skillet and press it slightly with a spatula. Cook for 2–3 minutes until the bottom is golden brown and the cheese begins to melt. Flip carefully and cook the other side for another 2–3 minutes. The edges should be crisp, the center molten, and the aroma irresistible.
- Serve: Once both sides are golden, remove the quesadillas from the pan and let them rest for a minute. Slice each into wedges and serve immediately with salsa, chopped cilantro, and a dollop of sour cream if desired. The contrast of hot, melty cheese with cool, tangy toppings is pure bliss.
That’s it—you did it. But hold on, I’ve got a few more tricks that will take this to another level. Let’s dive deeper into the nuances that elevate a simple dish into an unforgettable experience.
Insider Tricks for Flawless Results
The Temperature Rule Nobody Follows
Many cooks think a high heat is the key to a crispy quesadilla, but it’s the controlled, medium‑high heat that creates that perfect golden crust without burning the cheese. Keep the skillet at a steady medium‑high setting; if it starts smoking, reduce the heat slightly. This subtle adjustment preserves the cheese’s melt and prevents the tortillas from developing a bitter edge.
Why Your Nose Knows Best
Before you flip the quesadilla, pause and inhale deeply. If the aroma is a sweet, caramelized scent with a hint of spice, you’re ready. This sensory checkpoint saves you from over‑cooking or under‑cooking. If the scent is too raw, give it another minute.
The 5‑Minute Rest That Changes Everything
After cooking, let the quesadilla rest for exactly five minutes. This rest period allows the cheese to set slightly, preventing it from spilling out when you cut. It also lets the internal heat finish cooking the filling, ensuring every bite is hot and juicy.
The Perfect Fold
Fold the tortilla at a 45‑degree angle instead of a straight line. This diagonal fold creates a larger surface area, allowing more cheese to melt into the meat and ensuring a more balanced bite. It’s a small tweak that makes a big difference.
The Quick Melt Trick
If you’re in a hurry, sprinkle a few drops of milk or a splash of water over the cheese before flipping. This steam helps the cheese melt faster and creates a silkier texture. Just remember to wipe any excess liquid before serving to keep the tortilla crisp.
Creative Twists and Variations
This recipe is a playground. Here are some of my favorite ways to switch things up:
Smoky Chipotle Version
Swap regular chili powder for chipotle powder, add a splash of adobo sauce, and use a mix of pepper jack and cheddar. The smoky heat transforms the quesadilla into a bold, adventurous bite that’s perfect for chili‑loving crowds.
Mediterranean Twist
Replace ground beef with ground lamb, add diced tomatoes and spinach, and season with oregano and a pinch of cinnamon. Finish with crumbled feta and a drizzle of tzatziki. The result is a quesadilla that feels like a Greek gyro in a tortilla.
Veggie‑Rich Powerhouse
Omit the meat entirely and use a medley of roasted zucchini, mushrooms, and chickpeas. Add a sprinkle of nutritional yeast for a cheesy flavor. This vegetarian version is protein‑packed and satisfies the craving for comfort food.
Breakfast Burrito Quesadilla
Use scrambled eggs, diced ham, and a dash of hot sauce in place of the beef. Top with shredded Monterey Jack and a spoonful of salsa. This breakfast‑style quesadilla is a quick, protein‑rich start to any day.
Cajun Creole Kick
Add a pinch of cayenne, smoked paprika, and a splash of Creole seasoning. Toss in some sliced okra for crunch. The result is a spicy, savory quesadilla that nods to Southern comfort.
Dessert Quesadilla
Swap the beef for a sweet filling of chocolate chips, marshmallows, and a drizzle of caramel. Use a flour tortilla and top with powdered sugar. This sweet spin is a playful dessert that still feels like a classic quesadilla.
Storing and Bringing It Back to Life
Fridge Storage
Store leftover quesadillas in an airtight container in the refrigerator for up to three days. Wrap each quesadilla individually in parchment paper before placing them in the container; this keeps the tortillas from sticking together.
Freezer Friendly
For longer storage, wrap each quesadilla tightly in foil and place them in a freezer bag. They’ll stay good for up to two months. When ready to eat, thaw overnight in the fridge before reheating.
Best Reheating Method
Reheat in a skillet over medium heat, pressing gently with a spatula. Add a splash of water to the pan to create steam, then cover for a minute. This technique keeps the tortilla crispy and the cheese molten. A quick microwave can work, but it often results in a soggy tortilla.
Add a tiny splash of water before reheating—this steams back to perfection, ensuring each bite is as delightful as when it first came off the skillet.