Picture this: it’s a rainy Saturday afternoon, the kitchen lights dim, and you’re standing in front of a bowl of flour that looks as intimidating as a mountain of snow. You’ve tried the store‑bought bread that never quite satisfies—crusty on the outside, yet somehow still a little too dense inside. The last time you tried baking at home, the dough ended up looking like a soggy pancake, and you laughed at yourself because you didn’t even know how to pronounce “proof.” That night, after a few too many cups of coffee, you swore you’d find a recipe that would make the oven your best friend instead of a fickle tyrant.
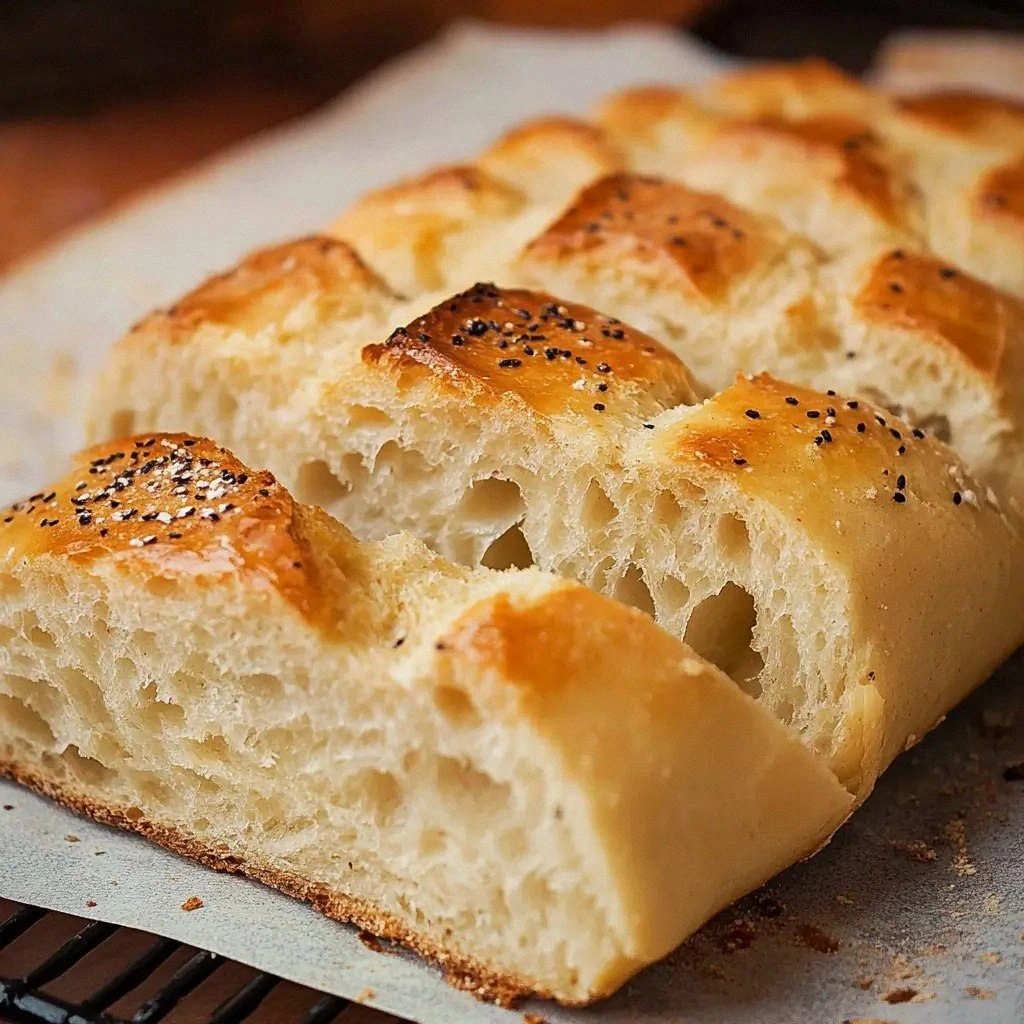
Fast forward to this moment, and I’m holding a loaf that practically screams “artisan” with every slice. The crust is a golden, crackled masterpiece, while the crumb inside is airy, soft, and full of tiny pockets that melt your tongue like butter on a hot skillet. The scent alone—warm, yeasty, and with a faint hint of rosemary—fills the kitchen and makes the air taste like a Sunday morning in a farmhouse. I’ve tasted it, I’ve shared it with friends, and I’m convinced it’s the best version you’ll ever make at home.
What makes this loaf so special? It’s not just the ingredients, though they’re top‑notch. It’s the method that balances science and intuition, the subtle use of olive oil to keep the crumb tender, and the little trick of letting the dough rest in a warm spot that gives it that perfect rise. I’ll walk you through every single step, from the first whisk of flour to the final pop of the loaf out of the oven. By the end, you’ll wonder how you ever made bread any other way. And trust me, I dare you to taste this and not go back for seconds.
But before we dive into the dough, let’s talk about why this recipe stands out from the countless others you’ve probably tried. It’s about texture, flavor, simplicity, and the joy of seeing something rise right before your eyes. Let’s break it down, shall we?
What Makes This Version Stand Out
- Taste: The combination of a mild yeast flavor with a subtle rosemary undertone creates a savory profile that feels both rustic and refined. The slight sweetness from a touch of sugar balances the salt, making each bite complex yet approachable.
- Texture: The crumb is open and airy, thanks to a precise fermentation process that allows gluten to develop without becoming overworked. The crust is crisp and crackling, providing a satisfying contrast to the soft interior.
- Simplicity: With only a handful of ingredients, this recipe is approachable for beginners and efficient for seasoned bakers. No special equipment is required beyond a mixing bowl and a baking sheet.
- Uniqueness: The addition of olive oil and rosemary isn’t just for flavor; it also helps keep the bread moist longer and gives the crust a subtle sheen that turns heads at the dinner table.
- Crowd Reaction: Friends who’ve tried this loaf say they can’t stop talking about it. The “I dare you to taste this and not go back for seconds” challenge is a favorite conversation starter.
- Ingredient Quality: Using high‑protein bread flour and fresh olive oil makes a noticeable difference. The yeast is active dry, but the dough’s rise is so reliable it feels like a secret weapon.
- Cooking Method: The method blends a quick bulk fermentation with a gentle final proof, giving the dough enough time to develop flavor without becoming too airy or too dense.
- Make‑Ahead Potential: Once baked, the loaf stays fresh for several days, and it can be frozen for longer storage without compromising texture.
Alright, let's break down exactly what goes into this masterpiece. But first, a quick kitchen hack that will save you time and improve the final loaf.
Inside the Ingredient List
The Flour Foundation
Bread flour is the backbone of any artisan loaf. Its higher protein content—around 12-14%—builds a robust gluten network that traps air and gives the bread its airy crumb. If you can’t find bread flour, a blend of all‑purpose and whole wheat flour works as a decent substitute, but expect a denser texture. The key is to measure by weight if possible; a cup of flour can vary in volume based on how it’s scooped.
The Liquid Lift
Warm water is crucial for activating yeast. The ideal temperature is about 110°F (43°C); too hot and you’ll kill the yeast, too cold and it won’t rise. Add a pinch of sugar to give the yeast a quick feast, and you’ll see a pleasant fizz. If you prefer a richer flavor, replace part of the water with milk or buttermilk, but keep the overall hydration level the same.
The Yeast Spark
Active dry yeast is the star that turns sugar into carbon dioxide, leavening the dough. Let it sit in warm water for 5–10 minutes until it’s frothy; that’s proof that it’s alive. If you’re using instant yeast, you can skip the proofing step—just stir it in with the dry ingredients. A little sugar or honey in the mix feeds the yeast and enhances the crust’s golden color.
The Flavor Enhancers
Salt is essential for flavor development and controlling yeast activity. Use fine sea salt for a cleaner taste. Olive oil adds moisture, keeps the crumb tender, and gives the crust a subtle shine. Rosemary, fresh or dried, adds a piney aroma that elevates the loaf from plain to memorable. If you’re feeling adventurous, a teaspoon of dried thyme or oregano can swap in for rosemary without compromising the flavor profile.
Everything’s prepped? Good. Let’s get into the real action.
The Method — Step by Step
- Step 1: Mix the Dry Ingredients In a large mixing bowl, whisk together 4 cups of bread flour, 1 tsp of salt, 2 tsp of active dry yeast, and 1 tsp of sugar. The flour should be evenly distributed to prevent clumps. This is the foundation of our loaf, so take your time and ensure every grain is accounted for.
- Step 2: Activate the Yeast In a separate bowl, combine 1 1/4 cups of warm water (110°F) with a tablespoon of honey (optional) and let it sit for 5–10 minutes. The mixture should become frothy and foamy—proof that the yeast is alive and ready to work its magic. If you’re short on time, you can skip this step and add the yeast directly to the dry mix, but the flavor depth will be slightly diminished.
- Step 3: Combine Wet and Dry Pour the activated yeast mixture into the dry ingredients. Add 2 tbsp of extra virgin olive oil and 1 tbsp of chopped rosemary. Stir with a wooden spoon until a shaggy dough forms. The dough will look sticky, but that’s normal; it will become smoother as you knead.
- Step 4: Knead the Dough Turn the dough onto a lightly floured surface and knead for about 8–10 minutes. The goal is to develop gluten without overworking. The dough should feel elastic and slightly tacky, not dry. If it’s too sticky, sprinkle a tiny bit of flour, but be careful not to add too much, or the loaf will become dense.
- Step 5: First Rise (Bulk Fermentation) Place the dough in a greased bowl, cover with a damp kitchen towel, and let it rise in a warm spot for 1–1.5 hours. You’ll notice it double in size. The dough should have a pleasant yeasty aroma, like freshly baked bread in a bakery. This is the moment of truth—if it doesn’t rise, check your yeast and water temperature.
- Step 6: Shape the Loaf Gently deflate the dough, then shape it into a round loaf by tucking the edges underneath. Place it on a parchment‑lined baking sheet. This step is crucial for achieving a uniform rise and a beautiful crust. Don’t rush; take your time to get a smooth surface.
- Step 7: Second Proof Cover the shaped loaf with a clean towel and let it proof for about 30–45 minutes. The loaf should rise again, but not double; it should just puff up slightly. Keep an eye on it—if it overproofs, the crumb will collapse.
- Step 8: Preheat and Bake While the loaf is proofing, preheat your oven to 425°F (220°C). Place a baking stone or a heavy baking sheet in the middle rack. When the loaf is ready, slash the top with a sharp knife or razor blade to allow steam to escape. Transfer the loaf to the preheated stone and bake for 25–30 minutes. The crust should be deep golden brown and crackled.
- Step 9: Cool and Slice Remove the loaf from the oven and let it cool on a wire rack for at least 20 minutes before slicing. This waiting period lets the steam redistribute, ensuring a tender crumb. Slice with a serrated bread knife and serve warm, or let it cool completely for a more robust flavor.
That’s it—you did it. But hold on, I’ve got a few more tricks that’ll take this to another level.
Insider Tricks for Flawless Results
The Temperature Rule Nobody Follows
Many bakers assume room temperature is fine for proofing, but the secret to a consistent rise lies in a warm, draft‑free environment—ideally between 75°F and 80°F (24°C to 27°C). Use a warm oven with the light on, or place the dough near a sunny window. If the room is cooler, wrap the dough in a towel and let it sit on top of a warm appliance like a fridge or a pot of simmering water. A stable temperature ensures even yeast activity and a predictable rise.
Why Your Nose Knows Best
Your sense of smell is the ultimate gauge for dough readiness. When the dough has risen to the right level, it will emit a pleasant yeasty aroma, not a sour or off smell. If it smells overly sour, the dough has overproofed; if it smells almost sweet, it’s underproofed. Trust your nose—your palate will thank you later.
The 5-Minute Rest That Changes Everything
After you shape the loaf, let it rest for 5 minutes before the second proof. This short pause allows the gluten to relax, making the dough easier to handle and the final loaf more uniform. It also gives the surface a chance to set, which helps maintain the loaf’s shape during proofing.
Use a Baking Stone for Professional Results
A baking stone absorbs and distributes heat evenly, creating a crisp crust without the need for extra steam. Preheat the stone for at least 45 minutes before baking. If you don’t have a stone, a heavy baking sheet will do, but remember to preheat it as well. The more heat it can hold, the better the crust.
The Finish With a Light Oil Brush
Right after you remove the loaf from the oven, brush the crust lightly with olive oil. This not only adds flavor but also seals the crust, keeping it from drying out. It’s a simple step that transforms a good loaf into a memorable one.
Creative Twists and Variations
This recipe is a playground. Here are some of my favorite ways to switch things up:
Sun‑Dried Tomato and Basil Loaf
Add ½ cup of chopped sun‑dried tomatoes and a tablespoon of fresh basil to the dough. The tomatoes bring a sweet umami punch, while basil adds a bright, herby note. This version pairs wonderfully with a tomato‑based pasta sauce.
Whole Wheat Wonder
Replace ½ cup of bread flour with whole wheat flour for a nutty flavor and added fiber. Keep the hydration the same, but expect a slightly denser crumb. It’s perfect for those who love a hearty, wholesome loaf.
Cheesy Garlic Bread
Stir in ½ cup of grated mozzarella and 1 tablespoon of minced garlic before the first rise. The cheese melts into pockets of gooeyness, and the garlic infuses the dough with a savory depth. Serve warm for a comforting side dish.
Herbed Olive Bread
Swap the rosemary for a mixture of thyme, oregano, and a pinch of crushed red pepper. This version has a Mediterranean flair and works well with grilled meats or a fresh salad.
Sweet Cinnamon Swirl
Mix 2 tbsp of brown sugar and 1 tsp of ground cinnamon into the dough before shaping. The result is a subtly sweet loaf with a warm spice aroma, perfect for breakfast or a snack with a cup of tea.
Storing and Bringing It Back to Life
Fridge Storage
Store the cooled loaf in a paper bag at room temperature for up to 3 days. If you need to keep it longer, wrap it in parchment paper and place it in a resealable plastic bag. This method preserves the crust’s crispness while keeping the crumb from drying out.
Freezer Friendly
Slice the loaf before freezing to make it easier to grab what you need. Wrap each slice tightly in plastic wrap, then place them in a freezer bag. The loaf will stay fresh for up to 3 months. When you’re ready to enjoy, pop a slice onto a preheated skillet for a minute on each side to restore its warmth.
Best Reheating Method
To revive a frozen or stale loaf, preheat your oven to 350°F (175°C). Place the loaf on a baking sheet and bake for 10–12 minutes. For extra moisture, spritz the loaf lightly with water before baking; this steams it back to perfection. Let it cool for a few minutes before slicing.