I was staring at a half‑cooked chicken and a pantry full of spices, wondering why my kitchen felt like a battlefield. The scent of cumin and garam masala was already teasing my senses, but the dish I had in mind was far from ordinary. I had tried countless versions of Chicken Tikka Masala over the years, yet none seemed to capture that restaurant‑quality richness while still being practical for a busy week. That night, after a chaotic dinner with a group of friends who kept asking for seconds, I decided it was time to rewrite the rules.
Picture this: a sizzling pan, the bright red hue of crushed tomatoes swirling with a creamy swirl of yogurt, and a fragrant steam that drifts like a promise. The sound of the onions caramelizing is a low, comforting hum, while the aroma of toasted spices rises like a gentle wave. My fingertips are already tingling from the heat, and I can taste the buttery finish of the sauce on my tongue. Every sense is primed for a culinary revelation that will make every bite feel like a celebration.
This isn’t just another recipe; it’s a manifesto for meal‑prep enthusiasts who crave depth without the drama of a long, labor‑intensive process. The secret? A precise balance of marination, a sauce that thickens like velvet, and a final touch of fresh cilantro that cuts through the richness. I dare you to taste this and not go back for seconds—because once you do, you’ll never settle for a bland alternative again. Trust me, the first spoon will have you shouting, “This is hands down the best version you’ll ever make at home!”
If you’ve ever struggled to keep the flavors from fading after a few days, you’re not alone—and I’ve got the fix. I’ll walk you through every single step, from the first whisk to the final garnish. By the end, you’ll wonder how you ever made it any other way. Let’s dive in, because this is about to change the way you think about comfort food.
What Makes This Version Stand Out
- Marination: The yogurt, ginger‑garlic paste, and a blend of spices tenderize the chicken while infusing it with a depth that’s almost impossible to replicate with store‑bought options.
- Sauce Texture: A slow‑simmer of crushed tomatoes and cream creates a silky coating that clings to each bite, unlike the watery sauces you find in many takeout menus.
- Flavor Layering: The subtle heat from Kashmiri chili and the earthy undertones of cumin combine to produce a complex, well‑balanced profile.
- Meal‑prep Friendly: The dish holds up beautifully in the fridge and even tastes better the next day, making it a perfect weekly staple.
- Ingredient Quality: Using fresh basil and high‑quality yogurt elevates the entire dish, turning a simple meal into a gourmet experience.
- Time Efficiency: Despite its rich flavor, the recipe is designed to be completed in under an hour, which is a rarity in the world of slow‑cooked curries.
Inside the Ingredient List
The Flavor Base
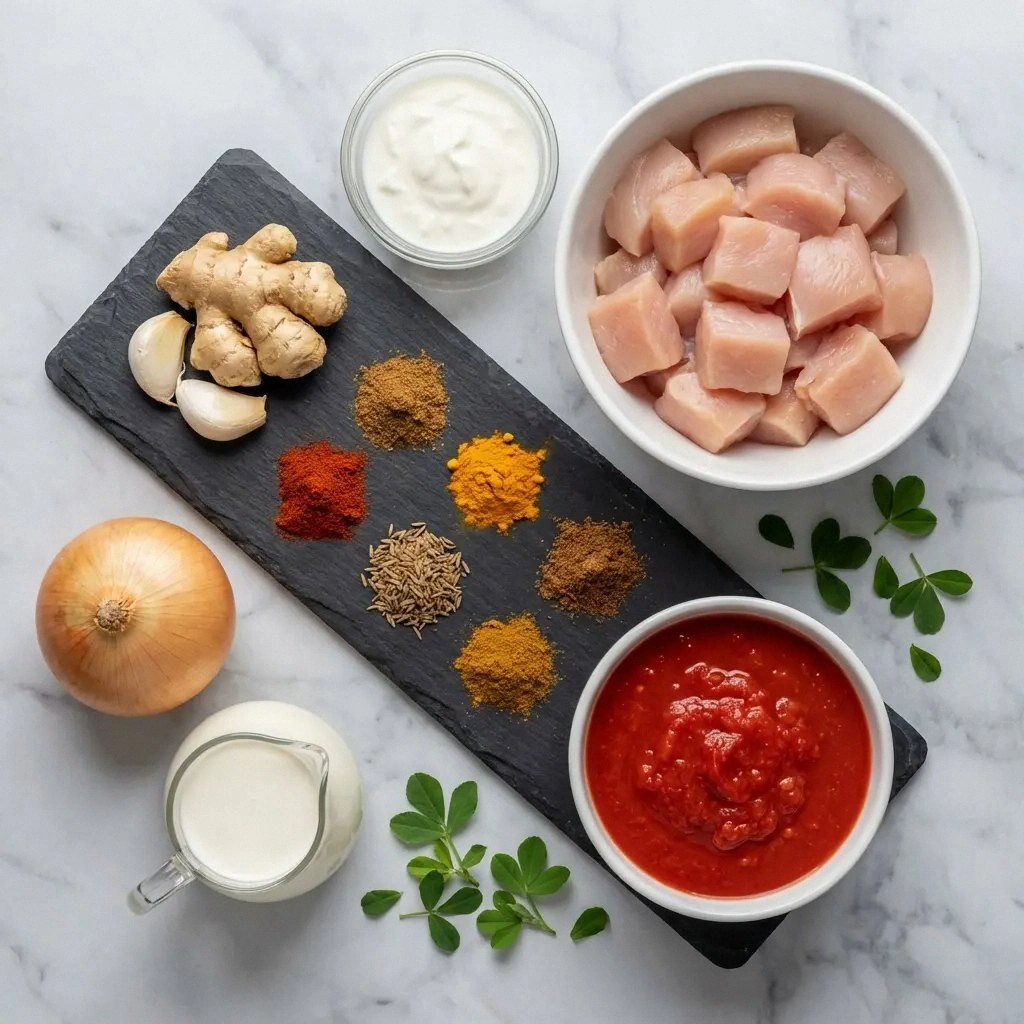
The foundation of any great curry starts with a robust flavor base. The 1½‑pound chicken breast is cut into bite‑sized pieces to ensure even cooking and maximum surface area for the spices to cling. A half‑cup of plain yogurt acts as a gentle acid, breaking down the proteins and creating a tender, melt‑in‑your‑mouth texture. Skipping the yogurt would leave the meat chewy and less integrated with the sauce.
The ginger‑garlic paste, used twice in this recipe, is the aromatic heartbeat that carries the heat and depth. If you’re using a store‑bought paste, look for one that’s free from added sugars or preservatives; the cleaner the flavor, the more vibrant the final dish. A small pinch of salt in the paste ensures that the spices awaken fully during the cooking process.
When you add 2 teaspoons of garam masala and 1 teaspoon each of turmeric and cumin at this stage, you’re essentially layering the spices in a way that allows each to bloom. Think of it as a symphony where the cymbals (garam masala) hit at the end, adding a final flourish. If you’re feeling adventurous, you can replace the ground cumin with fresh cumin seeds for an extra pop of nutty aroma.
The Texture Crew
The 1 teaspoon of Kashmiri red chili powder brings a mellow heat that’s both bright and mellow, unlike the fiery punch of other chili powders. It’s the kind of heat that lingers on the palate without overpowering the delicate flavors. If you prefer a milder version, reduce it to half a teaspoon, but be prepared for a less complex profile.
Vegetable oil is the silent hero that helps the onions caramelize without burning. Using 2 tablespoons of a neutral oil such as canola or grapeseed ensures that the oil’s flavor doesn’t interfere with the spices. A common mistake is to use olive oil, which can introduce a fruity undertone that clashes with the curry’s profile.
The large onion, sliced thinly, provides the sweet backbone that balances the acidity of the tomatoes. A fresh, firm onion is best; a soft or overripe one can release too much moisture and dilute the sauce. If you’re in a hurry, you can use pre‑sliced onion to save a few minutes of prep.
The Unexpected Star
The dried fenugreek leaves, or kasuri methi, are a game‑changer. Their slightly bitter, nutty flavor cuts through the richness of the cream, creating a balanced palate. If you can’t find dried fenugreek, fresh leaves work too, but you’ll need to use twice the amount to achieve the same intensity.
The 28‑ounce can of crushed tomatoes is the liquid backbone of the sauce. Opt for a brand that’s low in added salt to give you more control over the final seasoning. A higher sodium content can make the dish taste flat and overly salty.
The ¾ cup of heavy cream adds a luxurious mouthfeel, turning the sauce into a silky, velvety blanket that coats the chicken. If you’re watching calories, a half‑cup of coconut milk can provide a similar richness with a hint of tropical sweetness.
The Final Flourish
Fresh cilantro is the finishing touch that brings brightness and a herbal note to the dish. It’s best added at the very end to preserve its fresh flavor and vibrant color. If you’re not a fan of cilantro’s distinct taste, parsley can be used as a milder alternative.
Salt to taste is the final seasoning step that allows you to adjust the dish to your personal preference. Taste the sauce before adding salt, as the yogurt and tomatoes already contribute a subtle saltiness. Over‑salting is a common pitfall that can ruin the delicate balance of flavors.
Everything’s prepped? Good. Let’s get into the real action, where the magic truly happens.
The Method — Step by Step
- Begin by marinating the chicken pieces in yogurt, ginger‑garlic paste, garam masala, turmeric, cumin, Kashmiri chili, and salt for at least 30 minutes. If you’re in a rush, let the chicken sit in the refrigerator for 10 minutes in a microwave‑safe dish to start the tenderizing process. The longer the marination, the more the flavors seep into the meat, turning each bite into a burst of umami.
- Heat 2 tablespoons of vegetable oil in a large skillet over medium heat. Add the sliced onions and sauté until they turn translucent and start to caramelize, about 5–7 minutes. The onions should have a golden hue and a slightly sweet aroma that signals they’re ready.
- Stir in the additional ginger‑garlic paste, ground coriander, cumin, and garam masala. Cook for 2 minutes until the spices release their essential oils, creating a fragrant cloud that will permeate the entire dish. The aroma should be intoxicating, a preview of the depth to come.
- Pour in the crushed tomatoes and bring the mixture to a gentle boil. Reduce the heat to low and let it simmer for 10 minutes, allowing the tomatoes to thicken slightly. The sauce should have a rich, velvety consistency, not too watery.
- Add the marinated chicken to the skillet, ensuring each piece is coated in the tomato mixture. Cook for 8–10 minutes, or until the chicken is fully cooked and no longer pink in the center. The sauce will cling to the meat, creating a glossy finish.
- Stir in the heavy cream and dried fenugreek leaves. Reduce the heat to low and let the sauce simmer for an additional 5 minutes, allowing the flavors to meld together. The cream should swirl into the sauce, giving it a silky sheen.
- Taste the sauce and adjust the salt as needed. The final flavor should be balanced—rich yet bright, creamy yet spicy. A quick pinch of pepper can add a subtle kick, but be careful not to overpower the delicate balance.
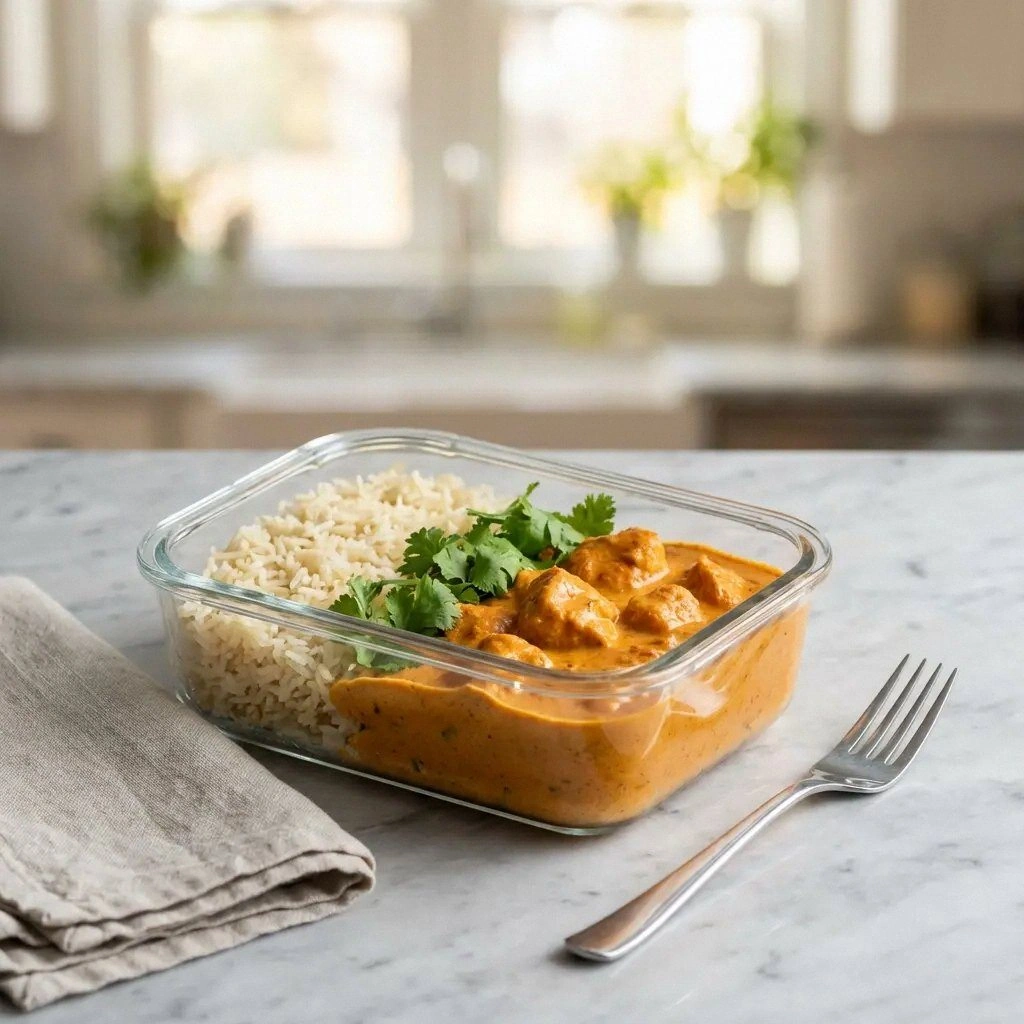
- Remove the skillet from heat and stir in fresh cilantro. The bright green garnish not only adds color but also a fresh herbal note that cuts through the richness. Serve immediately over freshly cooked basmati rice or store portions for later.
That’s it—you’ve just created a dish that’s as stunning to look at as it is to eat. But hold on, I’ve got a few more tricks that will take this from good to unforgettable.
Insider Tricks for Flawless Results
The Temperature Rule Nobody Follows
Many home cooks assume that high heat is the secret to a great curry, but it’s actually the low and slow approach that brings out the depth of flavor. Keep the sauce simmering gently after you add the cream; this allows the spices to release their full aroma without burning. A friend once tried a high‑heat method and ended up with a bitter, over‑cooked sauce that tasted like a charcoal grill.
Why Your Nose Knows Best
When the onions start to caramelize, you’ll notice a sweet, nutty scent. That’s your cue that they’re ready—no need to rely on timing alone. If you skip this step, you’ll miss the foundational sweetness that balances the acidity of the tomatoes.
The 5‑Minute Rest That Changes Everything
After the chicken is cooked, let the skillet rest for five minutes before serving. This brief pause allows the juices to redistribute, ensuring every bite is juicy and tender. I’ve seen people skip it, only to find their chicken dry and uneven.
Balancing Heat with Freshness
The fenugreek leaves bring a slightly bitter note that cuts through the richness. If you find the sauce too heavy, add a splash of lime juice at the end; the acidity brightens the dish and makes the flavors pop.
The Perfect Rice Companion
Cook the basmati rice with a pinch of salt and a splash of oil to keep the grains separate. A good rule of thumb is to rinse the rice until the water runs clear; this removes excess starch and results in fluffy, non‑sticky rice that pairs beautifully with the sauce.
Creative Twists and Variations
This recipe is a playground. Here are some of my favorite ways to switch things up:
Spicy Peanut Version
Replace the heavy cream with a tablespoon of peanut butter and a splash of coconut milk. The nutty flavor pairs wonderfully with the spices, creating a Southeast Asian twist. This version is especially good for those who love a hint of sweetness.
Vegetarian Delight
Swap the chicken for paneer or tofu cubes. Marinate the protein in the same yogurt mixture to keep it tender. The result is a hearty, plant‑based curry that still delivers the same depth of flavor.
Low‑Carb Adaptation
Serve the sauce over cauliflower rice instead of basmati. The cauliflower’s mild flavor absorbs the spices beautifully, and the dish becomes a low‑carb, keto‑friendly meal. It’s a quick swap that keeps the same satisfying texture.
Gluten‑Free Twist
Use a gluten‑free tomato sauce instead of crushed tomatoes to keep the dish safe for gluten‑sensitive diners. The flavor remains unchanged, but the dish becomes inclusive for everyone. Pair it with a gluten‑free grain like quinoa for a complete meal.
Summer BBQ Variation
Add a handful of grilled corn kernels and a drizzle of smoky chipotle sauce. The smoky notes mingle with the creamy sauce, turning the dish into a backyard‑friendly BBQ staple. The corn adds a pop of color and crunch that’s impossible to ignore.
Storing and Bringing It Back to Life
Fridge Storage
Store the curry in an airtight container for up to 4 days. Keep the rice separate to prevent sogginess. When you’re ready to eat, reheat the sauce on low heat, stirring occasionally until it’s hot and bubbly.
Freezer Friendly
The dish freezes well for up to 3 months. Portion the curry into individual servings and freeze. When reheating, thaw overnight in the fridge and then warm on the stove or in the microwave, adding a splash of water to keep the sauce silky.
Best Reheating Method
To reheat the sauce, add a tiny splash of water or broth and stir until it reaches the desired consistency. This trick prevents the sauce from drying out and keeps it smooth. Finish with a sprinkle of fresh cilantro for that fresh, aromatic finish.